随着支付宝,QQ AR技术的应用,越来越多的团队开始认识到AR的价值,可以说2016年AR技术离我们又进了一步。再往前倒一年,你会发现,其实双11会场也是做过AR红包的,但是当时的红包效果确实不怎么地,界面抖动的太厉害(没有对感应器做深层次的了解)。随之还有QQ火炬接力,当时没有记错的话,QQ的AR是好像2d的,设备要求在水平放置时,才能展示更好的效果。随着研究的深入,产品的效果也是越来越理想,这里介绍两个国内的AR产品。“视+”,基于标记的AR技术,逼格很高,也拥有了很庞大的用户群。”随便走“基于地理位置的AR技术,下面来几张截图:
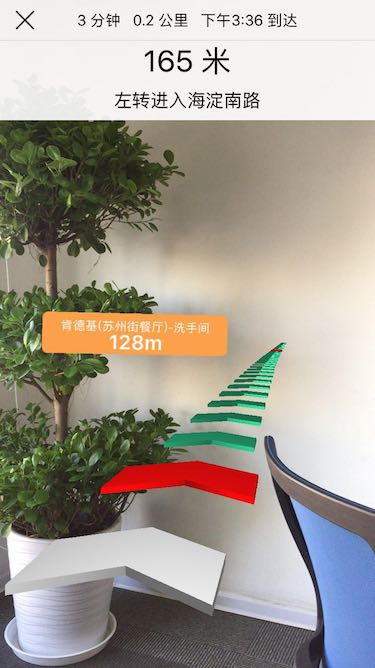
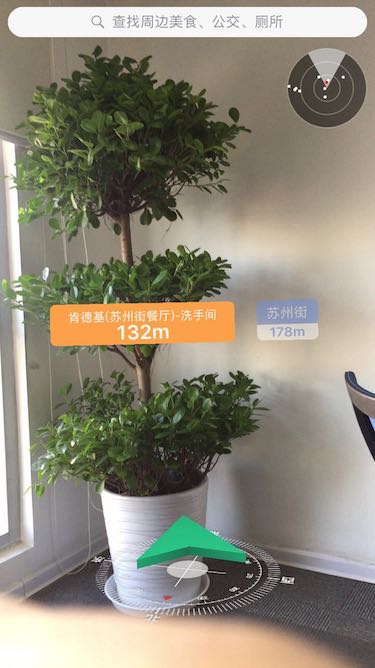
这次的主题也是基于地理位置的AR实现。
前期分析
在做这个产品之前,要明确我们要做什么,之前也说了,就是类似于”随便走“的效果的AR技术,但是不需要他的导航的这样的产品。那么就是这样的产品中包含哪些技术实现
- 后置摄像头取景
- 方向的获取
- 手机抬起的角度
后置摄像头的获取
这个技术倒是不难,直接使用UIImagePickerController就可以拿到后置摄像头录制的界面。同样使用AVFoundation也是可以拿到后置摄像头的信息的,这次的实现就是使用了AVFoudation来获取后置摄像头的信息。
.h文件
#import <UIKit/UIKit.h>

typedef NS_ENUM(NSInteger, QARViewState) {
    QARViewStateStartRunning,
    QARViewStateStopRunning,
    QARViewStateError
};

typedef void(^QARCompletionHandle) (NSError *error);

@interface QARView : UIView

@property (nonatomic, copy) QARCompletionHandle completionHandle;
@property (nonatomic, assign, readonly) QARViewState state;

- (instancetype)initWithFrame:(CGRect)frame completionHandle:(QARCompletionHandle)completionHandle;

@end
.m 文件的实现
#import "QARView.h"
#import <AVFoundation/AVFoundation.h>


@interface QARView ()

@property (nonatomic, strong) AVCaptureSession *captureSession;
@property (nonatomic, strong) AVCaptureDeviceInput *captureDeviceInput;
@property (nonatomic, strong) AVCaptureVideoPreviewLayer *captureVideoPreviewLayer;
@property (nonatomic, readwrite) QARViewState state;

@end

@implementation QARView

- (void)dealloc {
    [[NSNotificationCenter defaultCenter] removeObserver:self];
    [self.captureSession stopRunning];
    self.completionHandle = nil;
}

- (instancetype)init
{
    self = [super init];
    if (self) {
        [self initSelf];
        [self.captureSession startRunning];
    }
    return self;
}

- (instancetype)initWithFrame:(CGRect)frame
{
    self = [super initWithFrame:frame];
    if (self) {
        [self initSelf];
        [self.captureSession startRunning];
    }
    return self;
}

- (instancetype)initWithFrame:(CGRect)frame completionHandle:(QARCompletionHandle)completionHandle {
    self = [super initWithFrame:frame];
    if (self) {
        _completionHandle = completionHandle;
        [self initSelf];
        [self.captureSession startRunning];
    }
    return self;
}

- (void)layoutSubviews {
    [super layoutSubviews];
    self.backgroundColor = [UIColor whiteColor];
    self.captureVideoPreviewLayer.frame = self.layer.bounds;
}

- (void)initSelf {
    [self addDeviceInput];
    [self.layer addSublayer:self.captureVideoPreviewLayer];
    [self addNotification];
}

- (void)addNotification {
    [[NSNotificationCenter defaultCenter] addObserver:self selector:@selector(sessionRuntimeError) name:AVCaptureSessionRuntimeErrorNotification object:nil];
    [[NSNotificationCenter defaultCenter] addObserver:self selector:@selector(sessionStartRunning) name:AVCaptureSessionDidStartRunningNotification object:nil];
    [[NSNotificationCenter defaultCenter] addObserver:self selector:@selector(sessionStopRunning) name:AVCaptureSessionDidStopRunningNotification object:nil];
}

- (void)addDeviceInput {
    if ([self.captureSession canAddInput:self.captureDeviceInput])
        [self.captureSession addInput:self.captureDeviceInput];
    else {
        NSError *error = [[NSError alloc] initWithDomain:@"com.qunar.ar.error" code:-1002 userInfo:@{@"message":@"会话没有输入源"}];
        if (self.completionHandle) {
            self.completionHandle(error);
        }
        self.state = QARViewStateError;
    }
}

- (AVCaptureSession *)captureSession {
    if (!_captureSession) {
        _captureSession = [[AVCaptureSession alloc] init];
    }
    return _captureSession;
}

- (AVCaptureDevice *)captureDevicePositionBack {
    return [self getCameraDeviceWithPosition:AVCaptureDevicePositionBack]?:nil;
}

-(AVCaptureDevice *)getCameraDeviceWithPosition:(AVCaptureDevicePosition )position{
    NSArray *cameras= [AVCaptureDevice devicesWithMediaType:AVMediaTypeVideo];
    for (AVCaptureDevice *camera in cameras) {
        if ([camera position]==position) {
            return camera;
        }
    }
    return nil;
}

#pragma mark - Property init

- (AVCaptureInput *)captureDeviceInput {
    if (!_captureDeviceInput) {
        NSError *error;
        _captureDeviceInput = [[AVCaptureDeviceInput alloc] initWithDevice:[self captureDevicePositionBack] error:&error];
        if (error) return nil;
    }
    return _captureDeviceInput;
}

- (AVCaptureVideoPreviewLayer *)captureVideoPreviewLayer {
    if (!_captureVideoPreviewLayer) {
        _captureVideoPreviewLayer = [[AVCaptureVideoPreviewLayer alloc] initWithSession:self.captureSession];
        _captureVideoPreviewLayer.backgroundColor = [[UIColor whiteColor] CGColor];
        _captureVideoPreviewLayer.videoGravity=AVLayerVideoGravityResizeAspectFill;
    }
    return _captureVideoPreviewLayer;
}

-(void)sessionRuntimeError{
    NSError *error = [[NSError alloc] initWithDomain:@"com.qunar.ar.error" code:-1001 userInfo:@{@"message":@"QAR录制会话运行出错"}];
    if (self.completionHandle) {
        self.completionHandle(error);
    }
    self.state = QARViewStateError;
}

- (void)sessionStartRunning {
    if (self.completionHandle) {
        self.completionHandle(nil);
    }
    [self setState:QARViewStateStartRunning];
}

- (void)sessionStopRunning {
    if (self.completionHandle) {
        self.completionHandle(nil);
    }
    self.state = QARViewStateStopRunning;
}

@end
使用AVFoudation来获取后置摄像头的好处就是,AVFoundation更加接近底层,不必要做过多的封装开销,同时能更好的做容错处理。比如接听电话中断的处理..
方向的获取
我觉得这是整个工程中最大的难点!!!!!下面就来介绍,为什么这是最大的难点。首先我们可以从下面的方案中获取当前的方向
- CLLocation 中的 Heading
- CoreMotion 中的 magneticField
- CoreMotion 中的 Attitude(欧拉角) 中的 quaternion(四元素)
正如你能理解到的,可以从定位信息中(这里也是陀螺仪传递的信息,但是经过了矫正)拿到当前的指南针的角度,同时可以从陀螺仪感应器中拿到磁场在x,y,z三轴上的分量。这应该是正常人首先能想到的方法了。但是这两种方法都存在致命的缺陷,
首先说一下CLLocation中的trueHeading获取到的指南针的信息不受设备空间位置的影响
这个是很优秀的也是我们想要的结果
但是拿到的值不稳地(下面的红色的箭头),会出现很大幅度的抖动。
可能在简单的界面中看不是很直观,如果把这个值放在了AR目标物上.
这个目标物就会在横向不停的抖动。即便做了卡尔曼滤波,做了低通滤波

接下来说CoreMotion中magneticField磁场信息获取到的指南针的角度
你会发现绿色和蓝色箭头和红色箭头会存在很大的夹角,这个夹角是在设备抬起的时候导致的。
在现有的资料查询和实验后没有找到一个标准的公式,能将CoreMotion中的磁场信息转化成稳定的指南针信息
保留这个磁场的计算
上面的代码来自stackoverflow这里讲解了CoreMotion中的magneticField和CLLocation中的trueHeading的不同点。
同样尝试的还有CoreMotion中的欧拉角中的YAW,测试中发现这是一个不确定的值,没有参考系。所以导致设备找不着北(这个不清楚是个例还是真的就是这样)。使用欧拉角可能会存在万向节死锁的问题(这里如果只是使用欧拉角中的一个值的话,应该不会出现死锁)。
最后摸索的四元素,如果你去查资料,估计也很难明白它是什么作用。首先看一下他的结构
typedef struct
{
    double x, y, z, w;
} CMQuaternion;
给出的解释是在xyz向量中旋转的角度是w,他是一个四维的空间,很难讲的清楚。这里需要知道的就是,从这四个分量中可以拿到需要的pitch和compass角度,计算方法是:
// 用四元素来计算方向和旋转角度
CMQuaternion quat = motion.attitude.quaternion;
// 这个值在这里没有什么用处
// double myRoll = atan2(2*(quat.y*quat.w - quat.x*quat.z), 1 - 2*quat.y*quat.y - 2*quat.z*quat.z) ;
double myPitch = atan2(2*(quat.x*quat.w + quat.y*quat.z), 1 - 2*quat.x*quat.x - 2*quat.y*quat.y);
// yaw这个值来自正北
double myYaw = degreesConvert(atan2(2*(quat.z*quat.w + quat.x*quat.y), 1 - 2*quat.y*quat.y - 2*quat.z*quat.z));
拿到的Yaw的角度,经过测试是参考的指南针的方向,得到的值也很稳定。
实现
这里先来看一下成果
上面的gif就是完成之后的效果图了,为什么会是三份呢,在计算位置变化和绘制界面上采用了不同的方案。这也是一个渐变的过程,随着对AR技术了解的深入渐渐的趋向于用矩阵来计算目标物的位置移动,之后接触到了GLKit和sceneKit
UIView绘制目标并做位置移动。这里存在的优点和缺点是
- 学习和接入成本低
- 同样的计算方法UIView表现上很生硬,动画不流畅
下面是代码实现:
@interface QARViewManager ()
@end
@implementation QARViewManager
- (void)startMotion {
    __weak typeof(self) weakSelf = self;
    self.motion.motionCallback = ^(double zDegrees,double compassDegrees,double decareCompassDegrees, double xyTheta,NSError *error) {
        if (error) {
            [weakSelf excuteFailCallBack:error];
        } else {
            dispatch_async(dispatch_get_main_queue(), ^{
                __strong typeof(weakSelf) strongSelf = weakSelf;
                if (strongSelf) {
                    [strongSelf.radioView setRotate:compassDegrees];

                    QARModel *model = (QARModel *)(strongSelf.data[0]);
                    UIView *view = (UIView *)(strongSelf.visibleViews[0]);
                    double pointX = screenWidthHalf()*3.2*cos(M_PI_2 - (decareCompassDegrees - model.decareDegrees));
                    double pointY = screenHeightHalf()*2*sin(zDegrees);

                    model.point2dx = screenWidthHalf() + pointX;
                    model.point2dy = screenHeightHalf() - pointY;

                    view.center = CGPointMake(model.point2dx, model.point2dy);
                }
            });
        }
    };
    [self.motion updateMotion];
}
@end
GLKit绘制目标并做位置移动。这里存在的优点和缺点是
- 学习和接入的成本高
- 同样的计算方法UIView表现上很生硬,动画流畅
- 接口设计复杂
- 目标位置需要额外计算
下面是代码实现:
@interface QARViewManager ()
@end
@implementation QARViewManager
- (void)startMotion {
    __weak typeof(self) weakSelf = self;
    self.motion.motionCallback = ^(double zDegrees,double compassDegrees,double decareCompassDegrees, double xyTheta,NSError *error) {
        if (error) {
            [weakSelf excuteFailCallBack:error];
        } else {
            dispatch_async(dispatch_get_main_queue(), ^{
                __strong typeof(weakSelf) strongSelf = weakSelf;
                if (strongSelf) {
                    [strongSelf.radioView setRotate:compassDegrees];
                    QARModel *model = (QARModel *)(strongSelf.data[0]);
                    GLKMatrix4 modelViewMatrix = GLKMatrix4Translate(GLKMatrix4Identity, 6.0 * cos(M_PI_2 - (decareCompassDegrees - model.decareDegrees)), 6.0*sin(zDegrees), -3.0f);
                    // 将modelView矩阵赋值给需要做旋转的实例
                    modelViewMatrix = GLKMatrix4Rotate(modelViewMatrix, M_PI-xyTheta, 0.0, 0.0, 1.0);

                    strongSelf.glkView.effect.transform.modelviewMatrix = modelViewMatrix;
                    [strongSelf.glkView setNeedsDisplay];
                }
            });
        }
    };
    [self.motion updateMotion];
}

@end
SceneKit绘制目标并做位置移动。这里存在的优点和缺点是
- 学习和接入的成本一般
- 同样的计算方法UIView表现上很生硬,动画流畅
下面是代码实现:
@interface QARViewManager ()
@end
@implementation QARViewManager
- (void)startMotion {
    __weak typeof(self) weakSelf = self;
    self.motion.motionCallback = ^(double zDegrees,double compassDegrees,double decareCompassDegrees, double xyTheta,NSError *error) {
        if (error) {
            [weakSelf excuteFailCallBack:error];
        } else {
            dispatch_async(dispatch_get_main_queue(), ^{
                __strong typeof(weakSelf) strongSelf = weakSelf;
                if (strongSelf) {
                    [strongSelf.radioView setRotate:compassDegrees];
                    QARModel *model = (QARModel *)(strongSelf.data[0]);
                    SCNMatrix4 mat = SCNMatrix4MakeTranslation(3.0 * cos(M_PI_2 - (decareCompassDegrees - model.decareDegrees)), 3.6*sin(zDegrees), -3.0);
                    mat = SCNMatrix4Rotate(mat, M_PI-xyTheta, 0.0, 0.0, 1.0);
                    strongSelf.boxNode.transform = mat;
                }
            });
        }
    };
    [self.motion updateMotion];
}

@end
性能分析
当前界面中只是对单个目标物做位置的更新,所以三个方案中Animation检测都达到了60fs,随着目标物的增加,
UIView做位置的转化就会使得当前的帧率下降。GLKit和SceneKit的优势也会凸现出来,GLKit中存在剪裁的逻辑,减少了不在当前视窗的目标物的计算。
准备知识
下面是我在AR调研时学习和准备的知识
- CoreMotion陀螺仪
- AVFoundation获取后置摄像头
- 矩阵转换
- OpenGLES绘制目标物
- GLKit
- GameKit