remote Notification
在做远程推送的时候,需要向apple申请证书上的支持。首先介绍如何完成远程推送的前期准备,主要是证书的申请和制作,这里只做简单介绍。主要的操作都是在macOS系统上完成的,跟着操作一步一步来,就可以生成测试使用的证书:
- 登录到 iPhone Developer Connection Portal 并点击 App IDs
- 创建一个不使用通配符的 App ID 。通配符 ID 不能用于推送通知服务。例如,我们的iPhone程序ID像这样: AB123346CD.com.serverdensity.iphone
- 点击App ID旁的“Configure”,然后按下按钮生产 推送通知许可证。根据“向导”指导的步骤生成一个签名并上传,最后下载生成的许可证。此步骤在 Apple文档中 也有谈到。
- 通过双击.cer文件将你的 aps_developer_identity.cer 引入Keychain中。
- 在Mac上启动 Keychain助手,然后在login keychain中选择 Certificates分类。你将看到一个可扩展选项“Apple Development Push Services”
- 扩展此选项然后右击“Apple Development Push Services” > Export “Apple Development Push Services ID123”。保存为 apns-dev-cert.p12 文件。
- 扩展“Apple Development Push Services” 对“Private Key”做同样操作,保存为 apns-dev-key.p12 文件。
- 需要通过终端命令将这些文件转换为PEM格式:
openssl pkcs12 -clcerts -nokeys -out apns-dev-cert.pem -in apns-dev-cert.p12转换得到key的pem:
openssl pkcs12 -nocerts -out apns-dev-key.pem -in apns-dev-cert.p12如果你想要移除密码,要么在导出/转换时不要设定或者执行:
openssl rsa -in apns-dev-key.pem -out apns-dev-key-noenc.pem最后,你需要将键和许可文件合成为apns-dev.pem文件,此文件在连接到APNS时需要使用:
cat apns-dev-cert.pem apns-dev-key-noenc.pem > apns-dev.pem
或者使用有密码的:
cat apns-dev-cert.pem apns-dev-key.pem > ck.pem
将此文件保存为一个易记的名字,你有可能以后会用到它。上述步骤同样适合于生成产品许可证。
注:以上使用的证书转换成p12证书使用的密码都是1234
检验证书是否正确的方法:
telnet gateway.sandbox.push.apple.com 2195

上面的命令执行的返回

Trying 17.172.232.226…

Connected to gateway.sandbox.push-apple.com.akadns.net.

Escape character is ‘^]’.
它将尝试发送一个规则的,不加密的连接到APNS服务。如果你看到上面的反馈,那说明你的MAC能够到达APNS。按下Ctrl C 关闭连接。如果得到一个错误信息,那么你需要确保你的防火墙允许2195端口。
然后再次连接,这次用我们的SSL证书和私钥来设置一个安全的连接:
openssl s_client -connect gateway.sandbox.push.apple.com:2195 -cert apns-dev-cert.pem -key apns-dev-key.pem当你看到反馈的最下方returnCode=0就成功了
这里给出一个简单的pushme.php文件
<?php
    /**
    {
        "aps":{
            "alert":"此处有两个服务器需要选择,如果是开发测试用,选择第二名sandbox的服务器并使用Dev的pem证书,如果是正是发布,使用Product的pem并选用正式的服务器",     //消息首页展示内容
            "badge":10,                    //icon上未读消息标示个数
            "sound":"default",            //推送听到的铃声
            "data":{                    //推送消息主体,供程序启动时做相应处理
                "tid":1000001,            //通知Id 做设备打开通知上报数据使用
                "id":101,                //跳转id [可为课程id/计划id/文章id/ 是web页面默认为0]
                "type":0,    // 0 系统通知[默认] 1 好友新消息  2 新用户注册  3好友请求 4课程更新
                "systype":1,  //1 课程 2计划 3文章 4活动 5web页面跳转
                "url":"http://www.imooc.com/abc.html" //为4web页面跳转使用 |非4web页面清除url字段
            },
            "category"=>"CATEGORY_ID"     //用来快捷处理消息唯一标示
        }
    }

    */
    $deviceToken= 'ef92d3d412bd4c95d65b07c66170be8*******a6c25e54d643f3f3c707'; //没有空格
    $body = [];
    $type = 5;  //1 课程 2计划 3文章 4活动 5web页面跳转 控制推送内容

    ///拼接推送字符串
    switch ($type) {
        case 1:
            $content = '从搭建Golang开发环境开始, 一步步介绍Golang系统库之输入输出的功能及特性。结合行数统计及图片读取,在实战中扎扎实实的学习Golang';
            $body = array("aps" => array("alert" => $content,"badge" => 10,"sound"=>'default','data'=>array('tid'=>10000,'id'=>492,'type'=>0,'systype'=>$type)));
            break;
        case 2:
            $content = '随着互联网的发展速度迅猛,前端工程师职业越来越火热,想学习Web前端技能吗 ? 该路径从基础知识到实战案例演练,一步步带您快速掌握如何搭建网站静态页面、开发网站交互特效,为您打开WEB前端工程师大门。还在等什么?快来学习吧!';
            $body = array("aps" => array("alert" => $content,"badge" => 11,"sound"=>'default','data'=>array('tid'=>10001,'id'=>32,'type'=>0,'systype'=>$type)));
            break;
        case 3:
            $content = 'CodeStriker CodeStriker是一个免费&开源的Web应用程序,可以帮助开发人员基于Web的代码审查。它不但允许开发人员将问题、意见和决定记录在数据库中,还为实际执行代码审查提供了一个舒适的工作区域。 官方网站:http://codestriker.sourceforge.net/index.html 2)RhodeCode Rhode';
            $body = array("aps" => array("alert" => $content,"badge" => 12,"sound"=>'default','data'=>array('tid'=>10002,'id'=>2493,'type'=>0,'systype'=>$type)));
            break;
        case 4:
            $content = '高薪捉拿程序大拿';
            $body = array("aps" => array("alert" => $content,"badge" => 12,"sound"=>'default','data'=>array('tid'=>27820,'id'=>2493,'type'=>0,'systype'=>$type,'url'=>'http://t.imooc.com')));
            break;
        case 5:
            $alertBody = '我是整个alert的标题';
            $title = '我是一个主标题';
            $subtitle = '我是一个副标题';
            $body = array("aps" => array("alert" =>array("body"=>$alertBody,"title"=>$title,"subtitle"=>$subtitle),"mutable-content"=>1,"badge" => 13,"sound"=>'default','data'=>array('tid'=>10003,'id'=>0,'type'=>0,'systype'=>$type,'url'=>'http://t.imooc.com',"helloKey"=>"helloValue"),"category"=>"CATEGORY_ID"),"my-attachment"=>"http://newpic.jxnews.com.cn/003/001/209/00300120964_fab36aec.jpg");
            break;
        default:
            # code...
            break;
    }

    $ctx = stream_context_create();
    //如果在Windows的服务器上,寻找pem路径会有问题,路径修改成这样的方法:
    //$pem = dirname(__FILE__) . '/' . 'apns-dev.pem';
    //linux 的服务器直接写pem的路径即可
    stream_context_set_option($ctx,"ssl","local_cert","ck.pem");
    $pass = "1234";
    stream_context_set_option($ctx, 'ssl', 'passphrase', $pass);
    //此处有两个服务器需要选择,如果是开发测试用,选择第二名sandbox的服务器并使用Dev的pem证书,如果是正是发布,使用Product的pem并选用正式的服务器
    // $fp = stream_socket_client("ssl://gateway.push.apple.com:2195", $err, $errstr, 60, STREAM_CLIENT_CONNECT, $ctx);
    $fp = stream_socket_client("ssl://gateway.sandbox.push.apple.com:2195", $err, $errstr, 60, STREAM_CLIENT_CONNECT, $ctx);
    if (!$fp) {
    echo "Failed to connect $err $errstrn";
    return;
    }
    print "Connection OK\\n";
    $payload = json_encode($body);
    $msg = chr(0) . pack("n",32) . pack("H*", str_replace(' ', '', $deviceToken)) . pack("n",strlen($payload)) . $payload;
    echo "sending message :" . $payload ."\\n";
    fwrite($fp, $msg);
    fclose($fp);
?>
直接从网上找到的,没有改太多,但是很好用就是了。当你将ck.pem和pushme.php文件放在同一个文件夹下的时候,修改文件中的token和密码就可以发送到测试手机了。
如下是一个推送Notification打印的时候包含的所有信息
{
UNNotificationResponse: 0x17022b800;
actionIdentifier: com.apple.UNNotificationDefaultActionIdentifier,
notification: {
            UNNotification: 0x17022b960; date: 2016-07-25 10:06:13 +0000,
            request: {
                    UNNotificationRequest: 0x174022a60;
                    identifier: 802B986C-928B-40E9-8AC9-B6649DE5BC2C,
                     content: {
                            UNNotificationContent: 0x1740e9780;
                            title: 我是一个主标题,
                            subtitle: 我是一个副标题,
                            body: 我是整个alert的标题,
                            categoryIdentifier: CATEGORY_ID,
                            launchImageName: ,
                            peopleIdentifiers: (),
                            threadIdentifier: ,
                            attachments: (),
                            badge: 13,
                            sound: {
                                    UNNotificationSound: 0x1740bde20
                                      },
                            hasDefaultAction: YES,
                            shouldAddToNotificationsList: YES,
                            shouldAlwaysAlertWhileAppIsForeground: NO,
                            shouldLockDevice: NO,
                            shouldPauseMedia: NO,
                            isSnoozeable: NO,
                            fromSnooze: NO,
                            darwinNotificationName: (null),
                            darwinSnoozedNotificationName: (null),
                            trigger: {
                                    UNPushNotificationTrigger: 0x170000ff0;
                                    contentAvailable: NO,
                                    mutableContent: YES
                                    }
                            }
        }
}
从打印信息中我们没有看到自定义的信息,是不是出了问题。打一下断点调试一下,原来userInfo没有打印出来,Why,应该被打印的信息为什么被省略了。如下图
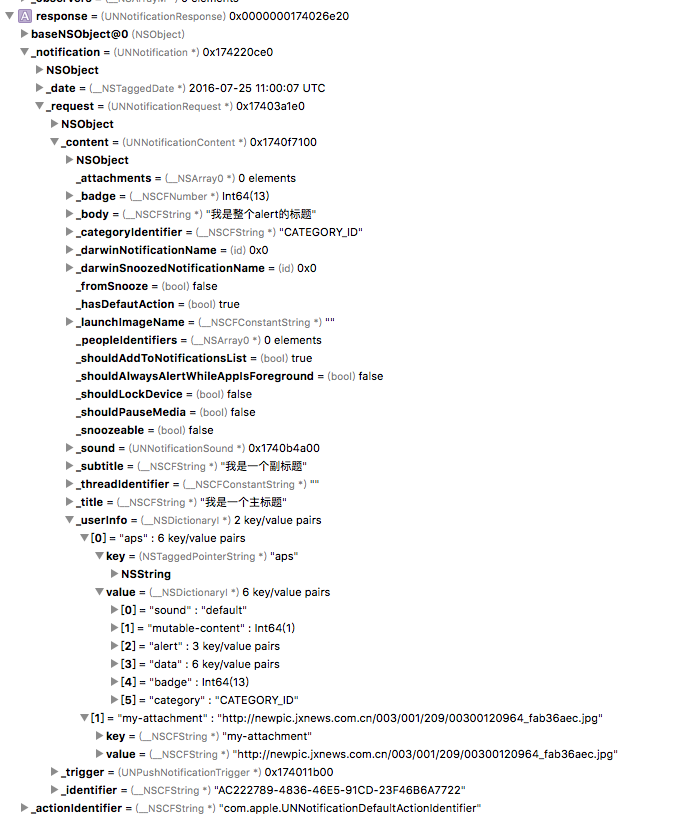
在上面的图片中就包含了我们自定义的信息。但是这里有一个问题,就是NotificationContent对象会向UserInfo这个对象中做检索,将里面对应key的信息提取到上层中直接展示。这一点在代码处理上也得到了验证。
到目前为止,工程已经调试完毕了。但是现在想尝试一下NotificationServie是如何被触发的,这样就可以自定义相关的notification第一个界面的展示了。在此之前 你需要做如下的操作,
- target中增加notificationServieExtension
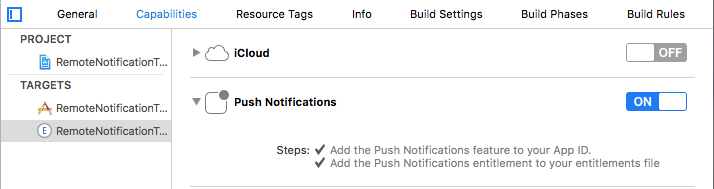
- 将主工程的target和extension的target中的capabilities中的push Notification通知打开。 这里需要注意的一点是。这里使用的证书必须是同一个teamID下的
测试的文件有image,gif,movie,但这些资源文件都是本地的(文件添加在extension中的bundle中)。刚才又测试了一下网络的数据传输,发现一个坑。在Apple的attachment附件api定义中附件的展示是一个url,也就是说当我拿到了一个例如网络图片的data数据的时候还是不能直接展示,需要将data存在在一个文件夹下生成对应的url,才能展示。但是extension不能操作APP的沙河,存储数据就只能写在APP group这个数据共享中,但简单的存储数据违背了app group共享数据的初衷。还有就是现在beta测试中不能同时打开push notification和App group两个capabilities,否则远程推送不能送达。
@available(iOS 10.0, *)
public class UNNotificationAttachment : NSObject, NSCopying, NSSecureCoding {


    // The identifier of this attachment
    public var identifier: String { get }


    // The URL to the attachment's data. If you have obtained this attachment from UNUserNotificationCenter then the URL will be security-scoped.
    public var url: URL { get }


    // The UTI of the attachment.
    public var type: String { get }


    // Creates an attachment for the data at URL with an optional options dictionary. URL must be a file URL. Returns nil if the data at URL is not supported.
    public convenience init(identifier: String, url URL: URL, options: [NSObject : AnyObject]? = [:]) throws
}

// Key to manually provide a type hint for the attachment. If not set the type hint will be guessed from the attachment's file extension. Value must be an NSString.
@available(iOS 10.0, *)
public let UNNotificationAttachmentOptionsTypeHintKey: String

// Key to specify if the thumbnail for this attachment is hidden. Defaults to NO. Value must be a boolean NSNumber.
@available(iOS 10.0, *)
public let UNNotificationAttachmentOptionsThumbnailHiddenKey: String

// Key to specify a normalized clipping rectangle to use for the attachment thumbnail. Value must be a CGRect encoded using CGRectCreateDictionaryRepresentation.
@available(iOS 10.0, *)
public let UNNotificationAttachmentOptionsThumbnailClippingRectKey: String

// Key to specify the animated image frame number or the movie time to use as the thumbnail.
// An animated image frame number must be an NSNumber. A movie time must either be an NSNumber with the time in seconds or a CMTime encoded using CMTimeCopyAsDictionary.
@available(iOS 10.0, *)
public let UNNotificationAttachmentOptionsThumbnailTimeKey: String
增加一个resourceData会更好,我是这样想的。这也是后话了,现在我使用的是Xcode beta 3和ios 10 beta 3。希望在之后会有改进
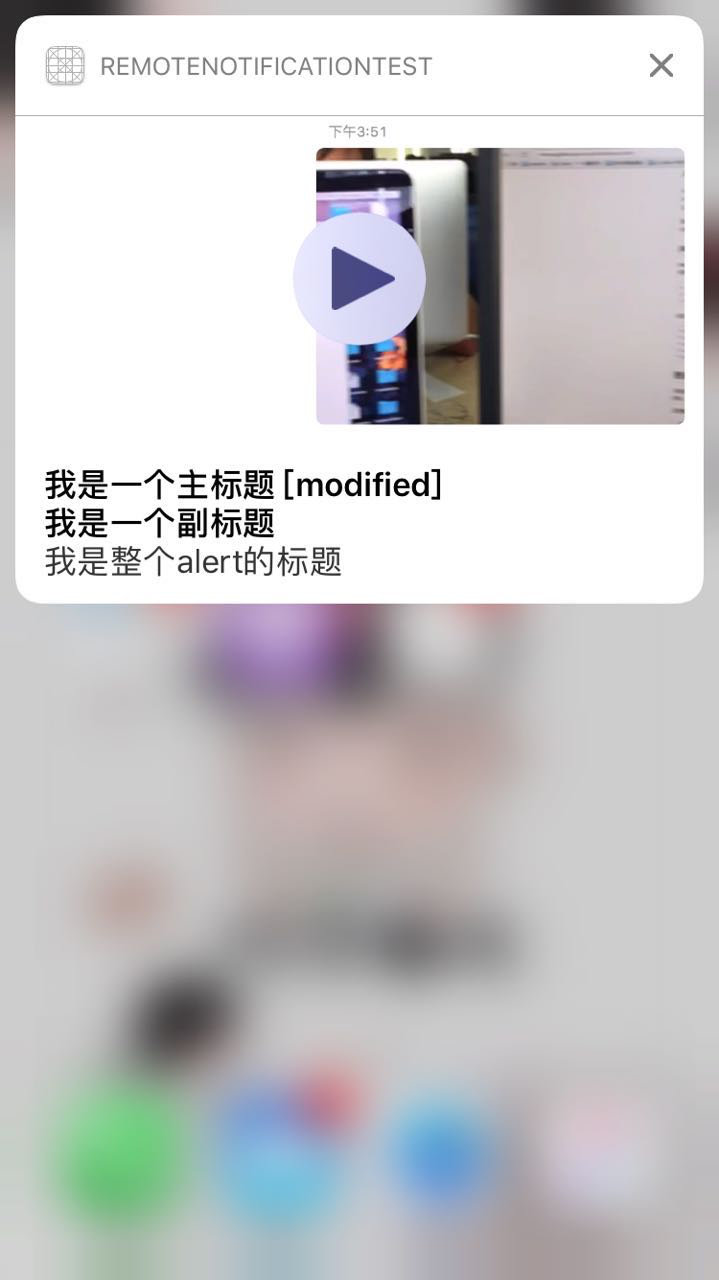
先让我们看一下资源文件在notification中是怎样的变现。这里根据WWDC的视屏,在target中添加了
- image
- gif
- movie
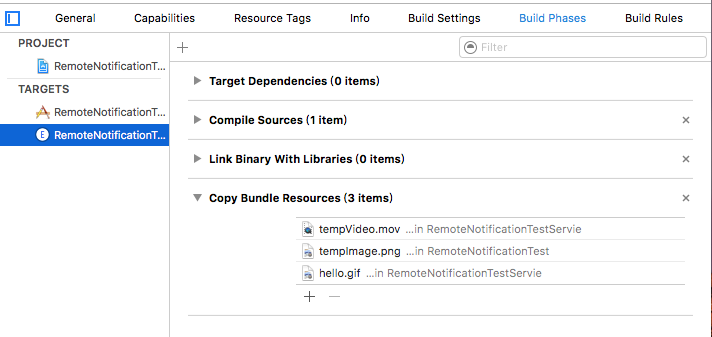
三个样式的资源,让我们看一下实现。
override func didReceive(_ request: UNNotificationRequest, withContentHandler contentHandler:(UNNotificationContent) -> Void) {
self.contentHandler = contentHandler
bestAttemptContent = (request.content.mutableCopy() as? UNMutableNotificationContent)
if let bestAttemptContent = bestAttemptContent {
// Modify the notification content here...
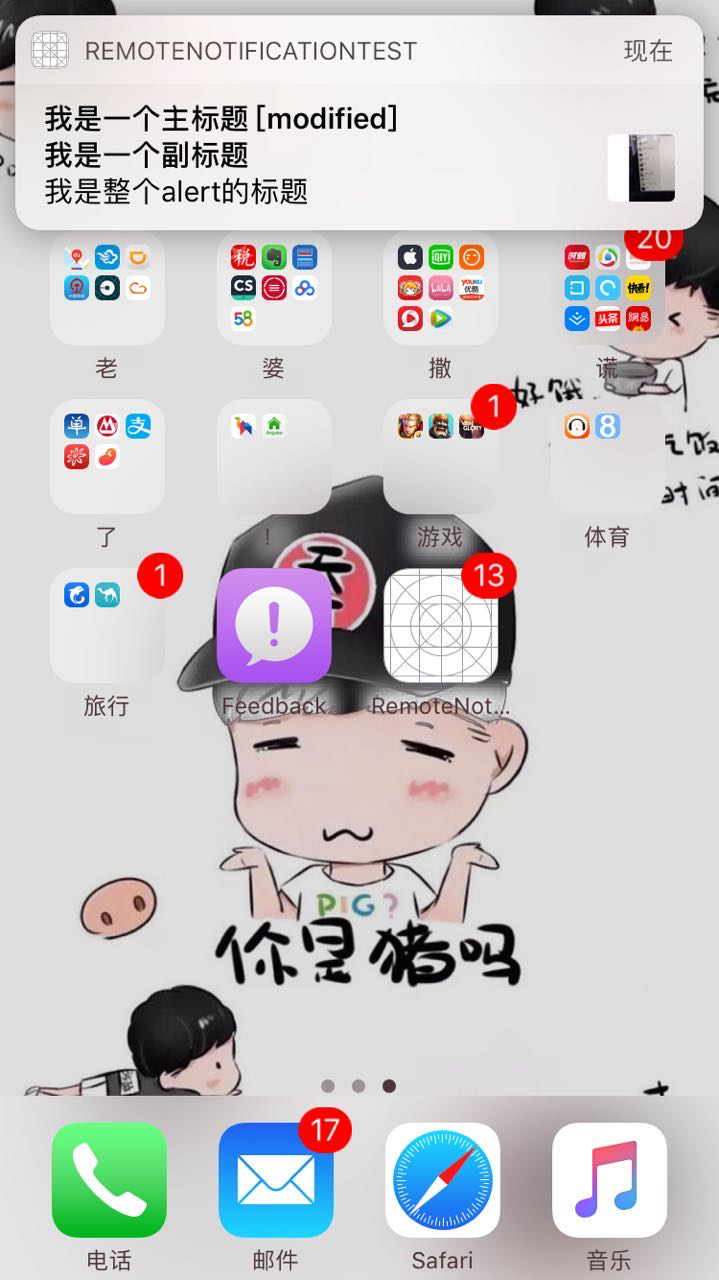
bestAttemptContent.title = "\(bestAttemptContent.title) [modified]"
// let path = Bundle.main.pathForResource("tempImage", ofType: "png")
// let path = Bundle.main.pathForResource("hello", ofType: "gif")
let path = Bundle.main.pathForResource("tempVideo", ofType: "mov")
let pathURL = URL.init(fileURLWithPath: path!)
do {
let attachment = try UNNotificationAttachment(identifier: "movie",url: pathURL,options: nil)
bestAttemptContent.attachments = [ attachment ]
} catch {
print("出错了")
print(error)
}
contentHandler(bestAttemptContent)
}
}下面看一下展示