LocationNotification实践
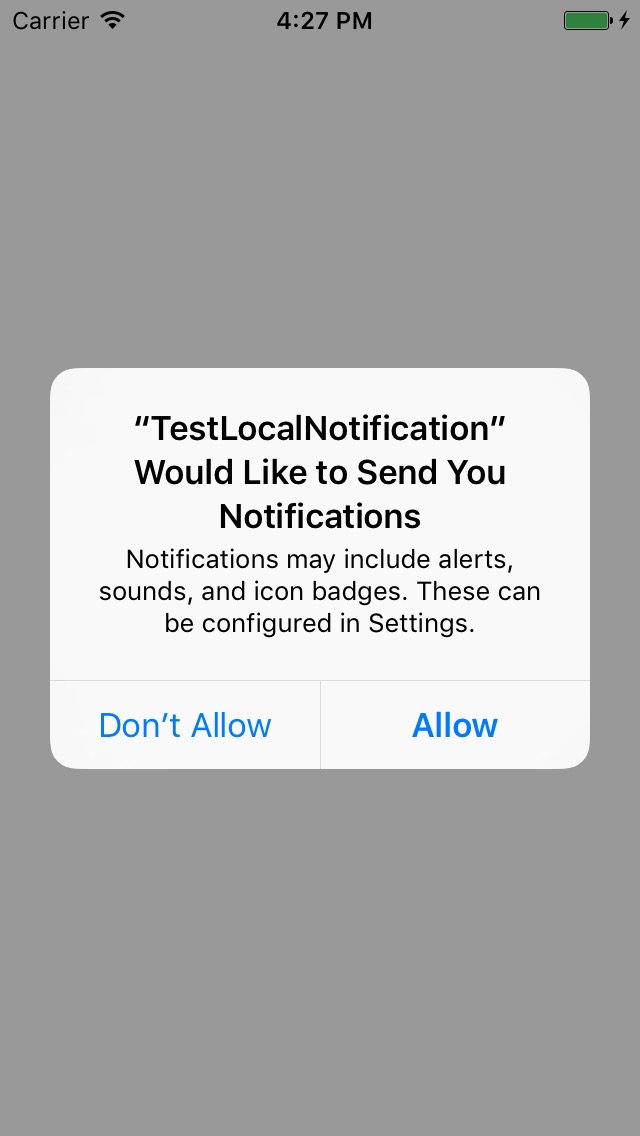
当你手上拿着锤子的时候,全世界都是钉子。迫不及待的想试验一下新的Notification到底长得什么模样。下载最新的Xcode beta,新建工程,开始用swift语言尝试写工程。首先向用户申请打开推送请求
// 向用户请求认证信息
func authorizationNotification() {
    UNUserNotificationCenter.current().requestAuthorization(options: [.alert,.sound,.badge]) { (granted, error) in
        if granted {
            // 用户已经认证了
            self.addNotificationHandleInApplication()
        }
        else {
            // 用户拒绝
            print("用户拒绝了")
        }
    }
}
当用户验证了之后,开始添加Notification代理,在这之前你需要import UserNotifications,同时继承协议UNUserNotificationCenterDelegate
// 添加notification 代理
    func addNotificationHandleInApplication() {
        let notification = UNUserNotificationCenter.current()
        notification.delegate = self
        notification.removeAllPendingNotificationRequests()
        registerLocalNotification()
    }
这个时候你就可以注册一个本地通知了,这里我定义的是一个actionNotification,同时带有附件,先给出生成附件的demo
// 生成简单的NotificationContent
func buildNotificationContent() -> UNMutableNotificationContent! {
    let content = UNMutableNotificationContent()
    content.title = "这是一个测试"
    content.subtitle = "这只是一个小小的本地测试"
    content.body = /*"简短的一个描述"*/"英国哲学家亚伦•瓦兹(Alan Watts,)说:快乐的秘密在于一句古语:“成为你自己。” 我第一次听到这句话,是妈妈跟我说的。小时候,老师让每个小朋友都说说自己以后的理想是什么。有人要做老师、医生、科学家。而我茫然无措,不知道想做什么,我因此求助妈妈,问她想让我做什么,她说你做你自己,最好的自己,我就会为你骄傲。然后把亚伦•瓦兹的这句话写到了我的本子上。长大成人以后,每次遇到选择,我都会想到这句话,然后毅然做出选择。直到今天,我都无限感激,父母让我以自己喜欢的方式过日子,我做自己喜欢的职业,嫁给自己喜欢的人,谨慎的做出选择,并且多年以后为自己的选择欣喜。"

    let path = Bundle.main.pathForResource("2", ofType: "png")
    let attachmentUrl = URL.init(fileURLWithPath: path!)
    let attachmentDict = [UNNotificationAttachmentOptionsTypeHintKey:"这是一个附件提示",
                          UNNotificationAttachmentOptionsThumbnailHiddenKey:(false),
                          UNNotificationAttachmentOptionsThumbnailClippingRectKey:"{100,100},{100,100}",
                          UNNotificationAttachmentOptionsThumbnailTimeKey:(5)]

    do {
        let attachment = try UNNotificationAttachment.init(identifier: "image", url: attachmentUrl, options:attachmentDict)
        content.attachments = [attachment]
    } catch {
        print("附件加载失败")
        print(error)
    }

    return content
}
在生成一个简单的notification
// 注册一个本地通知
func registerLocalNotification() {

    let content = buildNotificationContent()!

    let categorySet = NSMutableSet()

    // 创建两个LocalAction,在ios9上这两个action都是在一个类中
    let checkAction = UNNotificationAction(identifier: "check-Action", title: "查看", options: [.destructive])
    let applyAction = UNTextInputNotificationAction(identifier: "apply-Action", title: "回复", options: [.destructive], textInputButtonTitle: "回复的按钮",textInputPlaceholder: "输入你想恢复的内容")

    let simpleCategory = UNNotificationCategory.init(identifier: "simpleCategory", actions: [checkAction,applyAction], intentIdentifiers: ["asdfasd"], options: [])


    categorySet.add(simpleCategory)

    // 这里一定要保证identifier和category的identifier一致
    content.categoryIdentifier = "simpleCategory"

    // 将category放到通知中心方便辨识
    UNUserNotificationCenter.current().setNotificationCategories(categorySet.copy() as! Set<UNNotificationCategory>)

    // 用trigger来做时间上的检测,这里设置为10秒就触发
    let trigger = UNTimeIntervalNotificationTrigger.init(timeInterval: 10, repeats: true)

    // 组成notification 请求
    let request = UNNotificationRequest.init(identifier: "test", content: content, trigger: trigger)

    // 开始订阅这个推送
    UNUserNotificationCenter.current().add(request) { (error) in
        print("出错了")
        print(error)
    }
}
到目前为止已经是实现了发出notification的功能了,但是notification的代理还是没有实现,在ios10之后,只有两个代理
下面的代理是只在foreground下才会被触发
// notification 代理实现
func userNotificationCenter(_ center: UNUserNotificationCenter, willPresent notification: UNNotification, withCompletionHandler completionHandler: (UNNotificationPresentationOptions) -> Void) {

    // foreground的处理是放在这个函数处理的
    print("即将收到推送")
    print(notification)

    // 订阅的notification都显示
    completionHandler([.alert])
}
而下面的函数是在background下点击notification或是notification中的action才会触发
func userNotificationCenter(_ center: UNUserNotificationCenter, didReceive response: UNNotificationResponse, withCompletionHandler completionHandler: () -> Void) {

    // background 入口处理
    print("收到了推送")
    print(response)
    completionHandler()

}
ok,现在为止一切代码都已经实现完成了。run,看一下效果
点击allow
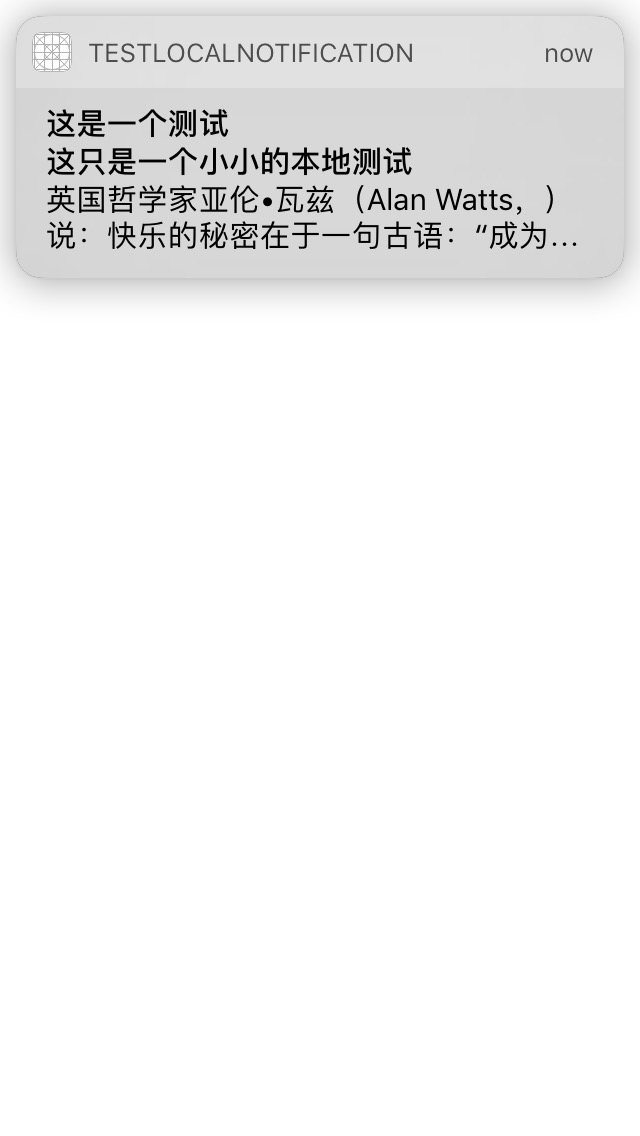
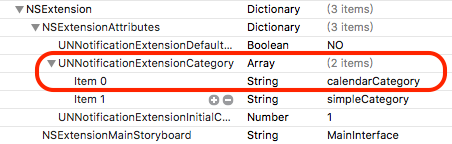
看到了比之前的notification是不是多了很多的内容呢。下面我们再来自定义一个notificationContent,添加addTagert->NotificationContent。此时最重要的是你要在notificationContent目录下的info.plist文件中加上这样的category identitifier,只有定义的category才会将notificationContent唤起
在func didReceive(_ notification: UNNotification)函数先实现
while self.view.subviews.count > 0 {
            self.view.subviews.last?.removeFromSuperview()
        }

        let button = UIButton.init(frame: CGRect.init(x: 0, y: 0, width: 100, height: 100))
        button.setTitle("测试按钮", for: UIControlState.normal)
        button.addTarget(self, action: #selector(NotificationViewController.helloWorld), for: UIControlEvents.touchUpInside)
        self.view.addSubview(button)

        let tempUrl = URL.init(string: "http://simg1.qunarzz.com/site/images/wap/home/recommend/120b72644806537f489219e939ab50e4.png")
        let imageView1 = UIImageView.init(frame: CGRect.init(x: 0, y: 120, width: 100, height: 100))
        imageView1.backgroundColor = UIColor.blue()
        self.view.addSubview(imageView1)
        DispatchQueue.global().async {
            print("进入后台线程")
            let shareSession = URLSession.shared
            let downloadTask = shareSession.dataTask(with: tempUrl!, completionHandler: { (data, responde, error) in
                if (data != nil) {
                    print("图片请求回调数据部位空")
                    DispatchQueue.main.async {
                        imageView1.image = UIImage.init(data: data!)
                    }
                }
            })
            downloadTask.resume()
        }

    let mapView = MKMapView.init(frame: CGRect.init(x: 100, y: 0, width: 250, height: 800))
    mapView.showsUserLocation = true
    mapView.isZoomEnabled = true
    self.view.addSubview(mapView)
这里包含了一个actionButton,一个mapView,一个网络图片,run来看一下效果
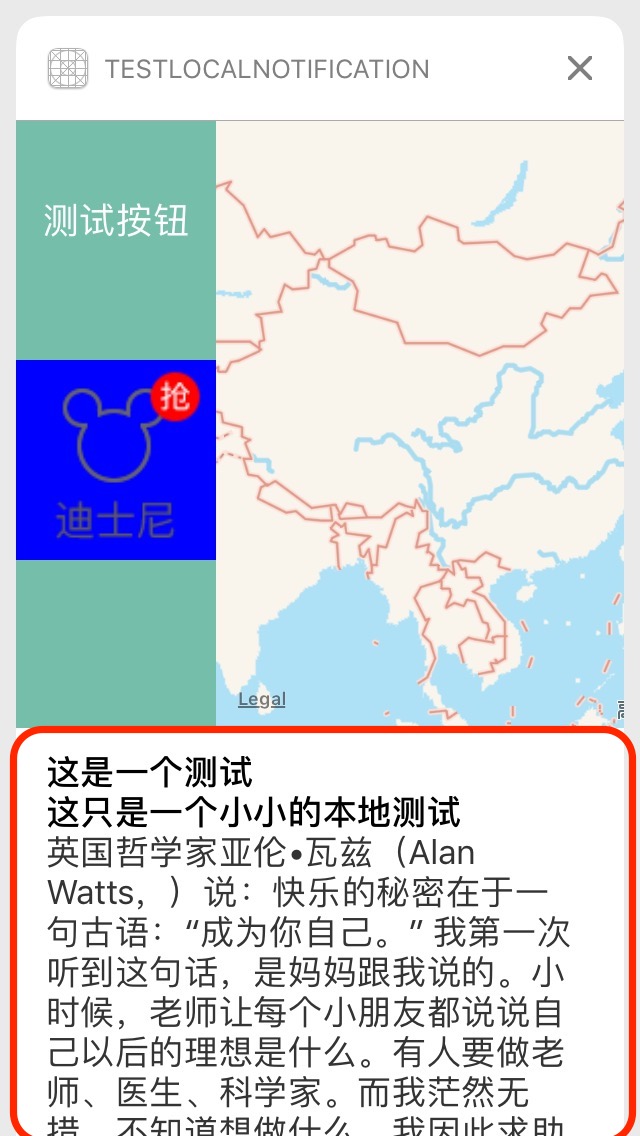
这个红色的区域其实系统自定义的,只要你的notificationContent中包含了title,subtitle,body就会自动展示。如果不想显示直接在info.plist中将

这样就不会展示了
因为远程推送xcode-beta中还是有一些bug,等迭代到相对稳定版本在测试吧!!!!!!